🐙 Git: Understanding the job parts
There are a lot of resources that cover the basics of git, how to create and clone repositories, how to commit, push, etc.
But I think there are not a lot of resources that mention specific scenarios that you will face when working in an organization as a software engineer.
That’s why I documented what I consider the most common scenarios that can make you struggle and sweat a bit if you are not used to dealing with these situations.
This is something I wish I knew before I started my first job as an engineer or something that I wish somebody had the time to explain in detail in order for me to actually understand what’s going on and go over step by step.
I hope I can be that guy for you.
💾 Stashing unfinished changes
Imagine you are working on a large feature at your current job, you already branch out to branch “my-awesome-feature” and you have made some good progress. Suddenly a wild 🐛 bug appears. Your manager acknowledges this as a high priority task and assigns this bug to you (🤦).
Now you have to switch from working on that new feature to solve the new bug. But, what about your current unfinished work? If you checkout from your branch and create a new branch for your new task, you will be automatically migrating all new unstaged files and changes to this new branch, and chances are you don’t want that. Well, how about you commit the new changes and then checkout to a new branch? Sounds tempting 🤔.
The truth is that you shouldn’t commit code that it’s unfinished or that it’s not completely working. If it’s half done or “broken” it will be very hard to figure out that you needed to do in order to fix it finish it, I’ve been there trust me you don’t want to do that.
So, what do you do 😱 ?
Enter git stash
You can temporarily ”stash” all of your new files and changes locally, so you don’t have to commit them, neither be shown in the bug branch you want to create nor lose them.
Let’s walk through this process:
You are in the initial branch “my-awesome-feature” where you do not want to commit the new changes because you are not done yet.
First, you have to stage the new changes and then stash them:
// stage new changes
git add -A
// stash them
git stash
Now git will return to you to the state of the previous commit (before the changes) and the uncommitted changes are now saved locally and temporarily in your .git folder.
Having done that, you can now proceed to create a new branch and start working on fixing the new bug.
// create a new branch
git checkout -b "fix-terrible-bug"

...do some working

// stage changes for fixing the bug
git add -A
// commit changes
git commit -m 'Change foo implementation to accept and optional string as argument'
// push your changes
git push origin fix-terrible-bug
Uff.. that was a lot of work 😅 feel like taking a break for a coffee ☕.
After you have drunk that tasty coffee, you can go back to work on the feature that you were originally working.
Let’s see how that will look like:
// get back to your original branch
git checkout my-awesome-feature
// apply the stashed uncommited changes
git stash apply
This will bring you back to the uncommitted changes that we stashed before. You did it 🎉 🥳!
Let’s recap:
- Stage and stash unfinished changes from your current branch
- Now with a “clean slate” checkout to a new branch and do some work (commit & push)
- Go back to the original branch and apply the stashed changes
Not that hard right?
Something to remember: You can still have merge conflicts when you try to apply staged files if somebody altered the same lines of code while you were working on something else but, you can resolve them as normal.
This will probably common a scenario that might happen often when working with teams and organizations. So I hope this example will help you solve and easily navigate those “problems” at your job.
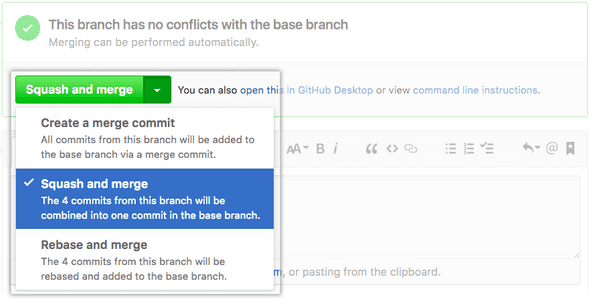
🍆 Squashing - I thought it was a fruit!
This will totally depend on the company and managers, but I found out that a lot of managers prefer squashing when merging to master.
Squashing means that all your commit messages will be combined into one commit message.
Why? There are a lot of reasons for this. The main reason is that if you have a lot of general or fixing type of commits, the git history will be floated with unnecessary commits.
Picture the following example:
- You started a new branch from
C2 - Your first commit
A1- Fix form validation A2- Update regexA3- Address feedbackA4- Fix typo
COMPANY_REPO ➤➤ C1 ➤➤ C2
                        \
                          ➤➤➤ A1 ➤➤ A2 ➤➤ A3 ➤➤ A4 [⬅ 4 commits on my new branch]
By selecting the “squash” feature from git, you are combining all of your commits into one final commit for the whole branch.
The final result will look like this:
COMPANY_REPO ➤➤ C1 ➤➤ C2 ➤➤➤ A5 [⬅ merge to master with 1 commit]Like I stated at the beginning, this is a way of doing it, not the way. By squashing you end up having a more concise and clean git history.
🎋 Updating your branch to master with rebase
Another common scenario that you will face while working with a team of engineers, it’s having an open branch with something some ongoing work and by the time you are ready to merge into to master, that branch might be outdated if somebody committed some work during that time window that you had your branch open. Let’s dive into this example.
This is the starting point, you created your new brach from the latest version of master. At this current state, you can merge to master without any issues because your branch is up to date.
COMPANY_REPO ➤➤ C1 ➤➤ C2 [⬅ branched and started feature from Commit 2]This is how the Git tree starts to look like after you begin to work on your new branch and added some commits to it.
COMPANY_REPO ➤➤ C1 ➤➤ C2
                        \
                        ➤➤➤ ME1 ➤➤ ME2 [⬅ my local branch]
But while you were working on your branch or perhaps while your PR was still being reviewed, a co-worker merged a pending PR to master adding a new commit - C3, causing your branch to be now behind from master.
In other words, your branch now needs to be updated to have the latest changes in order for you to merge to master.
COMPANY_REPO ➤➤ C1 ➤➤ C2 ➤➤ C3 [⬅ new commit]
                        \
                        ➤➤➤ ME1 ➤➤ ME2 [⬅ my local branch]
So how do we deal with this? How do we make our code have the latest changes and put your new changes “on top” of the last commit?
Our goal at this point is to make the tree look like this:
COMPANY_REPO ➤➤ C1 ➤➤ C2 ➤➤ C3
                              \
                                ➤➤➤ ME1 ➤➤ ME2 [⬅ my local branch]
In this scenario, our new changes will be merged on top of C3.
This is how we do it:
// First get the lates't commit (C3) from master:
git fetch origin

// Put our commits on top (rebase) of the latest changes
git rebase/origin master
After you merge your changes to master the tree should look like this:
COMPANY_REPO ➤➤ C1 ➤➤ C2 ➤➤ C3 ➤➤ ME1 ➤➤ ME2Wasn’t that easy?
At this point, if the code that was committed to master is not conflicting with any code that you added you should be good to go.
Guess what? Sometimes this is not the case, sometimes we have to merge conflicts.
🥊 Enter merging conflics
If you have some code that has merge conflicts, git will know with a dialog similar to this:
> # On branch my-awesome-branch
> # You have unmerged paths.
> #   (fix conflicts and run "git commit")
> #
> # Unmerged paths:
> #   (use "git add ..." to mark resolution)
> #
> # both modified:       email_form.js
> #
> no changes added to commit (use "git add" and/or "git commit -a")
This dialog is simply telling you that you have conflicting lines of code in the email_form.js file, and after solving these conflicts you must add this file again.
In addition, you can run git status to see a complete list of all the conflicting files in case you need to.
Now you can proceed to inspect that file using your code editor, and you would see something like this in the conflicting lines:
<<<<<<<<<<< HEAD
function validateInput(value, type) {
===========
function validateInputs(inputGroup, types) {
>>>>>>>>>>> Your Commit Name
If we stick to the previous example, this means that C3 the commit that was merged while your branch was open, changed that line and it’s now in the latest version of master.
Everything that is between <<< HEAD and === is the code that now lives on master that you don’t have in your branch, the new latest version.
And the code between === and >>> Your Commit Name is the local version, your local work living in your branch.
At this point, you should decide which version of the code to leave or sometimes you have to leave both the new code from master and your local changes.
For the purpose of this example let’s say that you are confident that your changes are the ones that need to remain, so you will have to eliminate the code from master, <<< HEAD and === and >>> Your...
The final code will look like this:
function validateInputs(inputGroup, types) {Now that you have fixed the conflicts you will need to do the following:
// add the changed filed
git add email_form.js

// continue the rebasing process
git rebase --continue
If the case is that you have more files that are conflicting you may need to repeat this process until all conflicts are resolved.
You can always start over in case that you messed up something by running git rebase --abort.
That’s it! I think this cover some of the most common scenarios that you will have to deal with as a software engineer that does not work in isolation, which rarely happens when you are part of a company. If you have any other scenarios that you struggled with when working with teams or different ways / tips to solve these cases, feel free to leave them in the comments or start a conversation with me at Twitter 😄.
Hope you enjoyed reading, Happy hacking! 👻
